Thursday, 31 July 2014

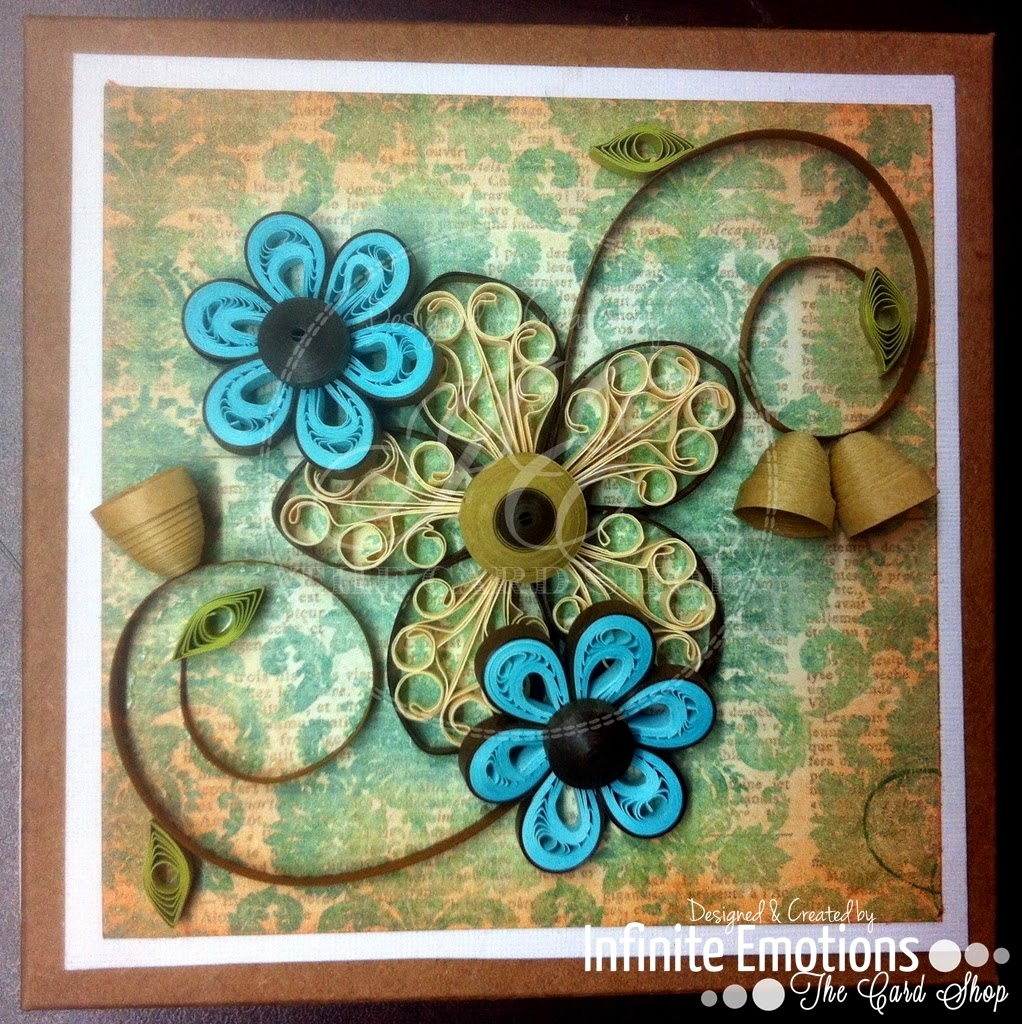
Throwback Thursday #1 | Quilled 30th Anniversary Card

I know, I know, it is pretty late, but I still wanted to get this done today.. I realised a while ago that there was a time when this blog was not active and though all of my stuff has made it to the Facebook Page, it never made it to the blog. Throwback Thursday posts will be a good way to bring them back to life and would give me a chance to blog about them.

So let's go back to one of the first cards I made. I made this in May 2011 for my in-laws 30th wedding anniversary. I had just bought a pack of patterened papers from Hobby Ideas, had one or two wood mounted rubber stamps (also from Hobby Ideas) and quilling supplies. I didn't even have my trimmer so I used a steel ruler, my craft mat and an exacto knife to cut the papers and over did the Quilling. It's like I made all the different kind of flowers I knew how to and put them all over the place! :P

Take a look...

Monday, 28 July 2014

Guest Designing | Lulupu Challenge #35 - Go 3D

Hello Folks!!!

I am Guest Designing for Lulupu - The Craft Lounge today. :D :D

Their current challenge is Go 3D and this is my first try at any 3D stuff. Still, if you want to check it out, click here to see the full post. And here's a sneak peek to get you a little curious! ;)


Plus, I may or may not have a tutorial for you. :P

See you at the Lulupu Blog! :D

Have a great week!

Love,
Nikita.. :)

Wednesday, 23 July 2014

Box Card | Lawn Fawn Stamps & Quilled Chocolates

So I have another box card for you which is one of the cutest we have made so far! This one marks one year since the couple first met. We did a little bit of a twist on the earlier box card that we made..

Here are the pictures...

Lawn Fawn Stamps (Love 'n Breakfast), PP from Kaisercraft's Save the Date Paper Pad,
some colouring with Faber Castell Watercolour Pencils 
and some distressing on the edges of the sentiment and the image
and this side was done..

Saturday, 19 July 2014

Scrapbook - Page #5: Honeymoon Travels

This post is the LAST POST in a series. To read all posts in this series, click here.


See previous pages here...
1 | 2 | 3 | 4

Right at this moment, I am feeling so so sad. This is the last page of the scrapbook and I have waited so long to share it and now that I have done that, I have nothing to look forward to! :( But I am sure there will be more and I will love those pages even more, so there is a light at the end of the tunnel :P So yay! :D

Anyway, let's see this page. This one captures the couple's honeymoon and the pictures - even though there were just two - were so so gorgeous that I had no choice but to use the best papers and the best combination of embellishments. So I picked this grey wooden background (which, honestly, I was planning to use for my personal scrapbook. That is, if I ever get to making one :P) from Crate Paper's Flea Market Collection and I fell in love!

Let's get started with the peeks now!!

This is the top left corner of the page and I have used Golden Striped Washi Tape 
and Wood Veneer Chevrons.
The little blue cloud is is from Kaisercraft's Hopscotch Collection (as are many other pieces on this page :P)

Wednesday, 16 July 2014

Box Card | Paper Lettering, Butterflies and Heart Shaped Cake

PICTURE HEAVY POST

If you're reading this on your mobile device, click here to read it in your browser.
That's the only way you can see the pictures the way they were meant to be seen.
Also, click on the images to see larger pictures. :)

Hello everyone!

I am sharing another box card today and I am so, so proud of this one. It was requested by a guy for his fiancée's birthday and he wanted us to go all out and make the best one possible. He also wanted her name to appear somewhere on the outside of the box. So Moumita and I thought, this was the perfect opportunity to do some lettering with 3mm quilling strips! And here's what we came up with.

We picked two colours from the pictures - dark pink/red and green - and started with that as a base to pick patterned papers, and here's what we had.

The pink mixed media sheet is from DCWV's Mixed Media Mambi Collection.
The green printed sheet is from one of the 12x12 sheets that Karuna destashed. 
This one one in particular was Fancy Pants Designs, I think.
The solid CSs used for layering (both pink & green) are from DCWV's Scrapbook in a Stack 8x8 pad.

So let's see what we did here.

One side of the box said 'Happy.' 
We did that with red quilling strips and added a few butterflies on the side.

Monday, 14 July 2014

Scrapbook - Page #4: Big Fat Wedding

This post is the FOURTH POST in a series. To read all posts in this series, click here.

See previous pages here...
1 | 2 | 3

Hello everyone and welcome to a brand new week!

Last week was so much fun!!! There was a wedding in the family and I have no idea how the went past!!! What's more is that I had to ensure that the posts didn't stop, so it took some extreme dedication and discipline on my part to finish them in advance and for the first time SCHEDULE them!! :P :P

Anyway, speaking of weddings, this page is all about the couple's wedding. An Indian wedding attire (especially for the bride) is traditionally in reds, maroons and pinks and this one was no different. So I chose a nice pink PP from Crate Paper's Flea Market Collection with pink hearts and all that bokeh effect with the hearts in the background. With the perfect paper in hand, I picked out all the matching embellishments and was ready to go! Let's start with peeks, shall we?

This is the top right corner of the page and aside from the washi tape, I've used two die-cut pieces
from none other than Kaisercraft's Hopscotch collection.

Friday, 11 July 2014

Girly Box Card With Black Mats

So this one was requested by my sister Ananya and her friend Navneet for their friend Komal's birthday!!! They're all childhood friends and have grown up together. Ananya was claiming her 'first one is free for family' voucher :P when she asked me to make a box card, I asked her if she wanted a theme and she told me to do whatever I wanted. I asked her if she wanted a specific colour and she said black. So I took it ahead from there.

For this box, I picked only one sheet of 12"x 12" PP (as opposed to two or three different ones that I usually use. Some cut downs for pro-bono work ;) ) from DCWV's Mixed Media Mambi Collection and this one in particular was a pretty busy pattern and went really well with the black CS layered underneath. Moumita worked on this one as well. I just assembled everything on the inside, as in, just glued them on the CS.

Let's take a look at the box..

Wednesday, 9 July 2014

Scrapbook - Page #3: Arranged Dating

This is the THIRD POST in a series of posts. To read all posts in this series, click here.

See previous pages here...
1 | 2

I love the title of the page. Even more so because it didn't come from me. The couple wanted to call their courtship as Arranged Dating and I thought it was pretty cool and I went along with it.

Let me start with peeks from various corners and angels of this page before showing the whole thing to you.

The background paper is from Crate Paper's Flea Market collection. 
The blue chevron PP is from My Mind's Eye's Citron Paper Pad from the Indie Chic collection.
I have used the Spellbinders Edgeabilitles Scallop Die and Distressed it with Tea Dye Distress Ink.
I have used the following thickers/chipboard stickers for the page title:
a) ARRANGED - Glitter Foam Thickers, Sunny Banana
b) DATING - Campy Trails Wood Stickers - Forest Chestnut by American Crafts

Monday, 7 July 2014

Hanging in a Car!

Hello everyone!!!

Today's project is highly unusual. I was asked to make something that could be hung inside a car. It is exactly what it sounds. Also, it had to be flat and had to depict a pleasant scenery of a car driving along the hillside. That was easy! Creating such scenes was all I did during drawing period in school. All I had to do was replace paint with distress ink, add some layers of paper to make it look real and do some stamping. So I decided to make a smaller version of an unframed painting with a hole pierced through it and some twine from in between so that it could be hung.

Then I thought, this thing would move around, and that would mean the other (blank) side would also be exposed, unlike a card. So I would have to do the EXACT same thing on the other side as well. And so I did.

Let's take a look! :D :D

A little glimpse of the sky, clouds and the mountains...

Saturday, 5 July 2014

Scrapbook - Page #2: Double Delight!

This post is the SECOND POST in a series of posts. To read all posts in this series, click here.


See first page here...

If you're reading this on your mobile device, click here to read this in your browser.
Click on the pictures for a better view and larger images.

All the pages in this scrapbook (so far, there are only five, including the cover. I am hoping I will get the opportunity to add more later) have a story to tell. 

Page #1 - Cover
Page #2 - When the couple's engagement was finalised/Roka done on her birthday (thus the page title)
Page #3 - Courtship
Page #4 - Wedding, and finally,
Page #5 - Honeymoon.

Now that I've explained the story behind the page title, let me reveal (again) that I was making this was around the time I had purchased a load of new craft supplies and Crate Paper's Flea Market collection was nothing like I'd seen before. To add to my delight and absolute craftasgmic pleasure, the die cuts from Kaisercraft's Hopscotch Collection co-ordinated so well with the papers that I am tempted to call this scrapbook the Flea Market Hopscotch Scrapbook. You know what, maybe I will! It's my creation, I get to call it whatever I want!!

And put those two together with some gorgeous washi tapes and wood veneers and we have ourselves a couple of fascinating pages! Here's one for sure.. Alright, I'll try and be humbler from this point forward.. :P

For this page, I used a teal coloured wood-grain background.
To the top of the page, I cut out a strip from on of the 12 x 12 sheets from DCWV's My Sunshine Paper Pad,
adhered it with only a little bit of glue and then and ran my Sew Easy tool over it.
So the upper section is actually stitched together by hand and will hold up even if the glue doesn't - not that it won't. :)
For the page title, I used two things...
a) American Crafts & Pebbles' Walnut Grove Thickers - DOUBLE
b) Studio Calico's Wood Veneer Alphabets - {DELIGHT}

Thursday, 3 July 2014

Box Card | Quilled Floral Paradise!

PICTURE HEAVY POST

If you are reading this on your mobile device, click here to read it in your browser.
Click on the pictures for a better view and larger images.

So this box card was requested by Moumita's cousin and he wanted us to go all out with the Quilling an we did. This was a double box card - a box within a box card - so that meant double the fun!! :D :D As it was for Moumita's cousin, I thought it would be good practice for her to make the box on her own. So I haven't done a thing in this, except selection of the PPs, the design and size of the flowers, the colours of the Quilling strips etc. In short, I designed, she created. I didn't lift a finger and I loved it!! :D :D

Let's talk about the outer box first. The papers used for this were from DCWV's Mixed Media Mambi Collection - Sides and Lid. We did green on two sides and orange on the other two. The design had one large Royal Flower and two smaller Malaysian flowers with a bit of leaves on the sides. This design was a slight modification of the design used on the lid of an older box card (image below.)
Complete post of the above box on the Lulupu Blog here.

The design was exactly the same for the green as well as orange side...
We tried something new here... We did a black outline on everything Quilled... 
Almost everything

Glimpses of the Green Side... :)